1. Get gists API
git리스트를 가져와서 페이지 좌측에 리스트를 보여주고, 클릭 시 우측에 상세내역을 표시하는 페이지를 Router를 활용하여 만들어보자.

2. Create Sidebar, Main Section Using Router
react-router-dom package를 install한다.
yarn add react-router-domreact-router-dom의 BrowserRouter, Link, Route를 import한다.
BrowserRouter로 warp한다.
import React from 'react';
//라우터를 사용하기 위해서는 BrowserRouter, Link, Route가 필요하다.
import { BrowserRouter as Router, Link, Route } from 'react-router-dom';
import './App.css';

class App extends React.Component {

  state = {
    gists: null
  }

//api 호출하여 gists state에 값을 set 해준다.
  componentDidMount() {
    fetch("https://api.github.com/gists")
      .then(res => res.json())
      .then(gists => {
        this.setState({ gists })
      })
  }

  render() {
    const { gists } = this.state;
    return (

      // 라우터를 사용하기 위해서 BrowserRouter로 wrap한다.
      <Router>
        <div className="Sidebar">
          {gists ? (
            gists.map(gist => (
              <div key={gist.id} className="text-ellipsis">
                // Link에 to로 이동할 경로를 세팅한다.
                <Link to={`/g/${gist.id}`}>
                  {gist.description || '[no description]'} {/*f || t returns true*/}
                </Link>
              </div>
            ))
          ) : (
              <div>Loading...</div>
            )}
        </div>
        <div className="Main">
          // path에 경로와 매핑할 component또는 render할 태그를 세팅한다.
          <Route exact={true} path="/" render={() => (
            <h1>Welcome</h1>
          )}></Route>
          {gists && (
            <Route path="/g/:gistId" component={Gist}></Route>
          )}
        </div>
      </Router>

    )
  };
}
const Gist = ({ match }) => (
  <div>
    {match.params.gistId}
  </div>
)
export default App;
.Sidebar {
  background-color: #ccc;
  width:30%;
  float: left;
}

.Sidebar a {
  text-decoration: underline;
}

.text-ellipsis {
  display: -webkit-box;
  -webkit-box-orient: vertical;
  -webkit-line-clamp: 1;
  word-break: break-all;
  text-overflow: ellipsis;
  overflow: hidden;
}

.Main {
  font-size: 32px;
  float: left;
  padding: .5rem .75rem;
}
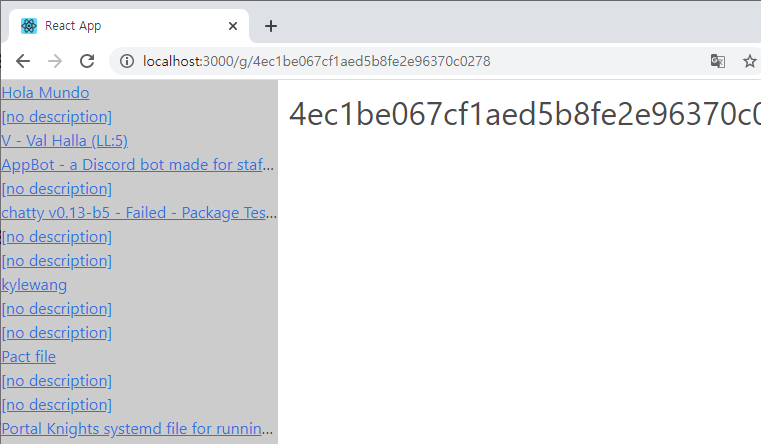
output : 기본 url 에서는 Welcome이 표시된다.
Sidebar를 선택할 때마다 URL마지막 부분에 parameter로 gistId가 전달되어야 한다.
: colon으로 parameter를 세팅할 수 있으며, route param은 gistId로 called된다.
<Route path="/g/:gistId" component={Gist}></Route>

Sidebar에 Link를 클릭하면 url이 변경되며, 우측에 git id가 표시된다.

3. Router match
링크 클릭시 매핑되는 컴포넌트에서 전달받는 match에는 다음과 같은 값들이 들어있다.

match.params....로 전달받은 dynamic parameter값을 사용할 수 있다.
이제, 매핑되는 컴포넌트에 git 상세데이터를 표기하도록 변경해보자.
import React from 'react';
import { BrowserRouter as Router, Link, Route } from 'react-router-dom';
import './App.css';

class App extends React.Component {

  state = {
    gists: null
  }

  componentDidMount() {
    fetch("https://api.github.com/gists")
      .then(res => res.json())
      .then(gists => {
        this.setState({ gists })
      })
  }

  render() {
    const { gists } = this.state;
    return (
      <Router>
        <div className="Sidebar">
          {gists ? (
            gists.map(gist => (
              <div key={gist.id} className="text-ellipsis">
                <Link to={`/g/${gist.id}`}>
                  {gist.description || '[no description]'} {/*f || t returns true*/}
                </Link>
              </div>
            ))
          ) : (
              <div>Loading...</div>
            )}
        </div>
        <div className="Main">
          <Route exact={true} path="/" render={() => (
            <h1>Welcome</h1>
          )}></Route>
          {gists && (
            <Route path="/g/:gistId" render={({ match }) => (
              <Gist gist={gists.find(g => g.id === match.params.gistId)} />
            )} />
          )}
        </div>
      </Router>

    )
  };
}

const Gist = ({ gist }) => {
  return (
    <div>
      <h1>{gist.description || 'No Description'}</h1>
      <ul>
        {Object.keys(gist.files).map(key =>
          <li key={key}>
            {gist.files[key].filename}
          </li>
        )}
      </ul>
    </div>
  )
}

export default App;
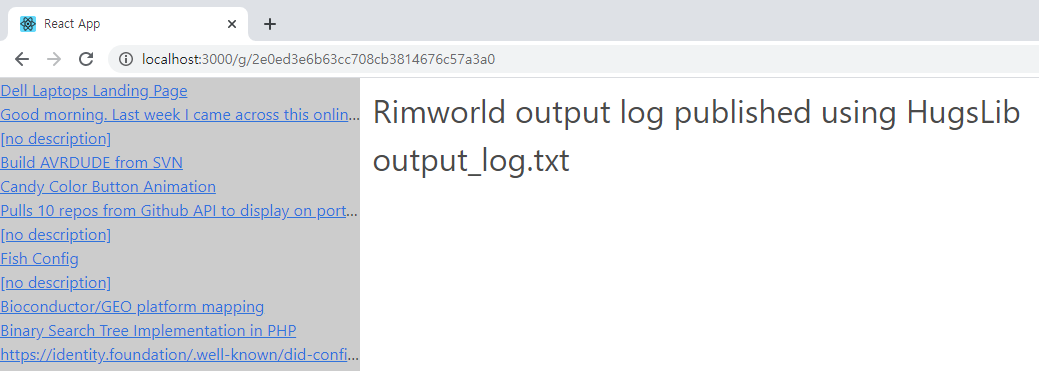
output : 링크를 클릭 시, 우측 화면에 해당 git의 description과 file리스트가 보여진다.

4. Conclusion
React Router를 사용하기 위해서는 react-router-dom package를 설치하여 사용한다.
BrowserRouter, Link, Route를 import한다.
Link Router에 dynamic param을 전달하여 사용할 수 있으며, match로 dynamic param값을 찾을 수 있다.
댓글