소스링크 : https://github.com/BigExecution/BlazorWASM.git
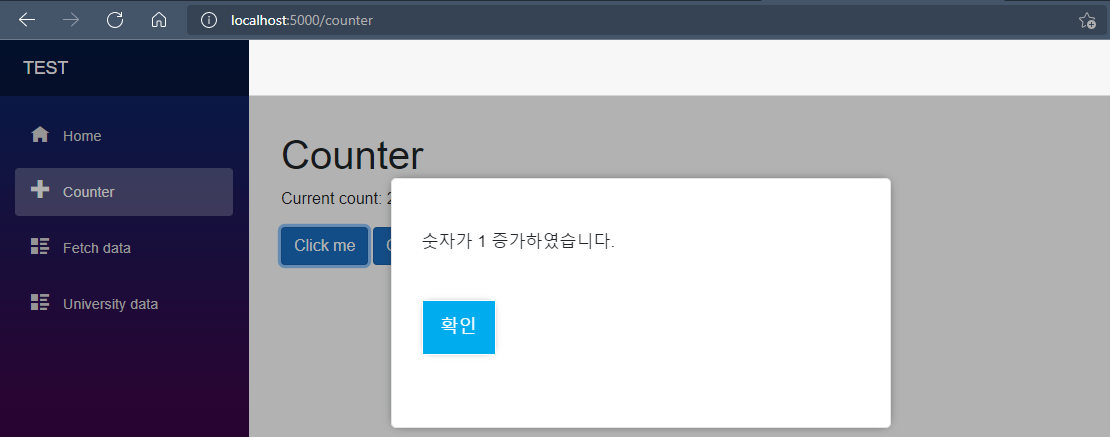
버튼을 클릭하고, LayerAlert를 띄우는 Component를 만들어보자.
Blazor WebAssembly 프로젝스 생성 시, 기본으로 추가되는 Counter의 Click me 버튼을 클릭했을때, 숫자 1 증가하였습니다. Alert을 띄워주도록 하자.
우선 LayerAlertComponent.razor를 추가한다.

Components 폴더를 생성하고 하위에 공통으로 사용할 Component razor를 추가한다.
LayerAlertComponent.razor를 추가한 뒤 소스는 아래와 같이 한다.
<div class="layer_popup">
    <div class="layer">
        <div class="text_area">
            <p>
                @((MarkupString)Value)
            </p>
        </div>
        <div class="btn_area">
            <button @onclick="OK">확인</button>
        </div>
    </div>
    <div class="dimmed"></div>
</div>

@code {

    [Parameter]
    public string Value { get; set; }

    [Parameter]
    public EventCallback<bool> OnClose { get; set; }

    private Task OK()
    {
        return OnClose.InvokeAsync(true);
    }
}
문구를 Value라는 parameter로 받아서 표시해 주고, 확인 버튼을 누르면 콜백함수가 호출되는 구조이다.
해당 Component를 counter.razor에 추가해주자.
@page "/counter"
@using TEST.Components
<div class="content">
    <h1>Counter</h1>
    <p>Current count: @currentCount</p>
    <button class="btn btn-primary" @onclick="IncrementCount">Click me</button>
</div>

@if (DeleteAlert)
{
    <LayerAlertComponent Value="@layerPopupComment" OnClose="@OnLayerAlertClose"></LayerAlertComponent>
}

@code {
    private int currentCount = 0;
    protected string layerPopupComment = string.Empty;
    public bool DeleteAlert { get; set; }

    private void IncrementCount()
    {
        currentCount++;
        layerPopupComment = "숫자가 1 증가하였습니다.";
        DeleteAlert = true;
    }

    protected void OnLayerAlertClose()
    {
        DeleteAlert = false;
        StateHasChanged();
    }
}
LayerAlertComponent를 가져올 수 있도록 @using TEST.Components 를 추가해준다.
Click me를 클릭하면 숫자를 증가시키고, DeleteAlert를 true로 하여 Alert이 보여지고, 확인버튼을 클릭하면, DeleteAlert를 False로 하여 보이지 않게 처리한다.
이제 어느 razor페이지에서든지 LayerAlertComponent를 추가하여 사용할 수 있다.

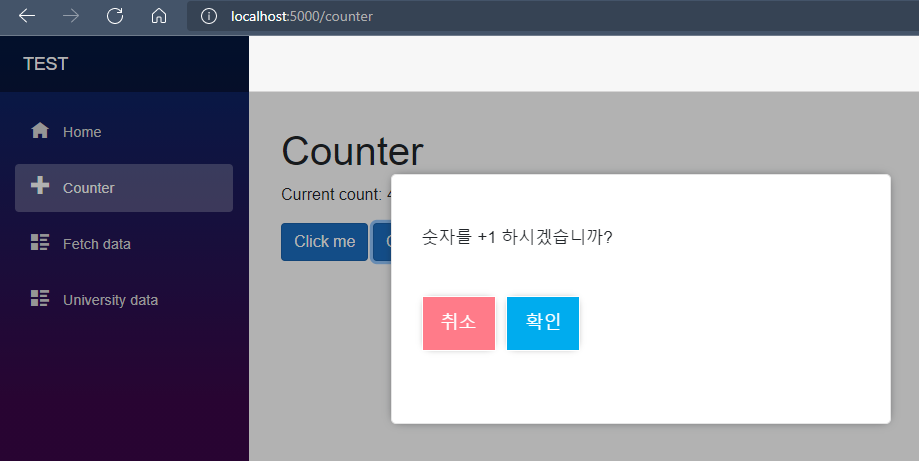
이번에는 1을 증가할지 안 할지 물어보는 LayerConfirmComponent를 추가해보자.

LayerConfirmComponent.razor 소스
<div class="layer_popup">
    <div class="layer">
        <div class="text_area">
            <p>
                @((MarkupString)Value)
            </p>
        </div>
        <div class="btn_area">
            <button class="btn_Cancel" @onclick="Cancel">취소</button>
            <button @onclick="OK">확인</button>

        </div>
    </div>
    <div class="dimmed"></div>
</div>
@code {

    [Parameter]
    public string Value { get; set; }

    [Parameter]
    public EventCallback<bool> OnClose { get; set; }


    private Task OK()
    {
        return OnClose.InvokeAsync(true);
    }

    private Task Cancel()
    {
        return OnClose.InvokeAsync(false);
    }
}
취소를 클릭하면 콜백함수에 false를 반환하고, 확인을 클릭하면 true를 반환한다.
이제 Counter.razor에 추가해보자.
@page "/counter"
@using TEST.Components
<div class="content">
    <h1>Counter</h1>
    <p>Current count: @currentCount</p>
    <button class="btn btn-primary" @onclick="IncrementCount">Click me</button>
    <button class="btn btn-primary" @onclick="IncrementCount2">Click me 2</button>
</div>

@if (DeleteAlert)
{
    <LayerAlertComponent Value="@layerPopupComment" OnClose="@OnLayerAlertClose"></LayerAlertComponent>
}


@if (DeleteConfirm)
{
    <LayerConfirmComponent Value="@layerPopupComment" OnClose="@OnLayerConfirmClose"></LayerConfirmComponent>
}
@code {
    private int currentCount = 0;
    protected string layerPopupComment = string.Empty;
    public bool DeleteAlert { get; set; }
    public bool DeleteConfirm { get; set; }

    private void IncrementCount()
    {
        currentCount++;
        layerPopupComment = "숫자가 1 증가하였습니다.";
        DeleteAlert = true;
    }

    private void IncrementCount2()
    {
        layerPopupComment = "숫자를 +1 하시겠습니까?";
        DeleteConfirm = true;
    }

    protected void OnLayerAlertClose()
    {
        DeleteAlert = false;
        StateHasChanged();
    }

    protected void OnLayerConfirmClose(bool accepted)
    {
        DeleteConfirm = false;

        if (accepted)
        {
            currentCount++;
        }

        StateHasChanged();
    }
}
Click me 2 버튼을 추가해서, 클릭 시 DeleteConfirm을 true로 하여 LayerConfirmComponent를 보여준다.
취소를 클릭하면 OnLayerConfirmClose가 실행되면서 숫자를 증가시키지 않고, 확인을 클릭하면 숫자를 증가시킨다.
그리고 LayerConfirmComponent를 숨김처리한다.

취소를 클릭할때는 숫자가 증가하지 않고, 확인을 클릭할때만 숫자가 증가하는 것을 확인할 수 있다.
'Blazor' 카테고리의 다른 글
| Blazor Sever VS Blazor WebAssembly 장단점 (2) | 2021.10.02 |
|---|---|
| Blazor WASM] Google Chart 그리기 (0) | 2021.09.30 |
| Blazor WASM] REST API, DropDownList onchange 데이터 연동 (0) | 2021.09.16 |
| Blazor WASM] REST API, API로 리스트 가져와서 뿌려주기 (1) | 2021.09.16 |
| Blazor WASM] ILogger, 로깅 사용하기 (0) | 2021.09.09 |


댓글